-- This script was generated by the ERD tool in pgAdmin 4.
-- Please log an issue at https://github.com/pgadmin-org/pgadmin4/issues/new/choose if you find any bugs, including reproduction steps.
BEGIN;


CREATE TABLE IF NOT EXISTS public.sales_transaction
(
    transaction_id integer NOT NULL,
    transaction_date date NOT NULL,
    transaction_time time without time zone NOT NULL,
    sales_outlet_id integer NOT NULL,
    staff_id integer NOT NULL,
    customer_id integer NOT NULL,
    PRIMARY KEY (transaction_id)
);

CREATE TABLE IF NOT EXISTS public.product
(
    product_id integer NOT NULL,
    product_type_id integer NOT NULL,
    product_name character varying(100) NOT NULL,
    product_description character varying(250) NOT NULL,
    product_price double precision NOT NULL,
    PRIMARY KEY (product_id)
);

CREATE TABLE IF NOT EXISTS public.sales_outlet
(
    sales_outlet_id integer NOT NULL,
    sales_outlet_type character varying(20) NOT NULL,
    address character varying(100) NOT NULL,
    city character varying(30) NOT NULL,
    sales_outlet_telephone character varying(20),
    postal_code integer NOT NULL,
    sales_outlet_manager_id integer,
    PRIMARY KEY (sales_outlet_id)
);

CREATE TABLE IF NOT EXISTS public.staff
(
    staff_id integer NOT NULL,
    first_name character varying(50) NOT NULL,
    last_name character varying(50) NOT NULL,
    "position" character varying(50) NOT NULL,
    start_date date NOT NULL,
    staff_location character varying(10) NOT NULL,
    PRIMARY KEY (staff_id)
);

CREATE TABLE IF NOT EXISTS public.customer
(
    customer_id integer NOT NULL,
    customer_name character varying(50) NOT NULL,
    customer_email character varying(100) NOT NULL,
    customer_since date NOT NULL,
    customer_card_number character varying(30),
    customer_birthdate date,
    customer_gender character varying(1) NOT NULL,
    PRIMARY KEY (customer_id)
);

CREATE TABLE IF NOT EXISTS public.sales_detail
(
    transaction_id integer NOT NULL,
    product_id integer NOT NULL,
    quantity integer NOT NULL,
    price double precision NOT NULL,
    sales_detail_id integer NOT NULL,
    PRIMARY KEY (sales_detail_id)
);

CREATE TABLE IF NOT EXISTS public.product_type
(
    product_type_id integer NOT NULL,
    product_category character varying(50) NOT NULL,
    product_type character varying(50) NOT NULL,
    PRIMARY KEY (product_id)
);

ALTER TABLE IF EXISTS public.sales_transaction
    ADD FOREIGN KEY (staff_id)
    REFERENCES public.staff (staff_id) MATCH SIMPLE
    ON UPDATE NO ACTION
    ON DELETE NO ACTION
    NOT VALID;


ALTER TABLE IF EXISTS public.sales_transaction
    ADD FOREIGN KEY (sales_outlet_id)
    REFERENCES public.sales_outlet (sales_outlet_id) MATCH SIMPLE
    ON UPDATE NO ACTION
    ON DELETE NO ACTION
    NOT VALID;


ALTER TABLE IF EXISTS public.sales_transaction
    ADD FOREIGN KEY (customer_id)
    REFERENCES public.customer (customer_id) MATCH SIMPLE
    ON UPDATE NO ACTION
    ON DELETE NO ACTION
    NOT VALID;


ALTER TABLE IF EXISTS public.product
    ADD FOREIGN KEY (product_type_id)
    REFERENCES public.product_type (product_type_id) MATCH SIMPLE
    ON UPDATE NO ACTION
    ON DELETE NO ACTION
    NOT VALID;


ALTER TABLE IF EXISTS public.sales_detail
    ADD FOREIGN KEY (transaction_id)
    REFERENCES public.sales_transaction (transaction_id) MATCH SIMPLE
    ON UPDATE NO ACTION
    ON DELETE NO ACTION
    NOT VALID;


ALTER TABLE IF EXISTS public.sales_detail
    ADD FOREIGN KEY (product_id)
    REFERENCES public.product (product_id) MATCH SIMPLE
    ON UPDATE NO ACTION
    ON DELETE NO ACTION
    NOT VALID;

END;Task 3: Create ERD
Project
You’re an engineer for a coffee shop chain that is looking to expand nationally by opening a number of franchise locations. As part of their expansion process, they want to streamline operations and revamp their data infrastructure.
Your job is to design their relational database systems for improved operational efficiency and to make it easier for their executives to make data driven decisions.
Currently their data resides in several different systems:
- accounting software
- suppliers’ databases
- point of sales (POS) systems
- spreadsheets
You will review the data in all of these systems and design a central database to house all data. You will then create the database objects and load them with source data. Finally, you will create subsets of data that your business partners require, export them, and then load them into staging databases that use different RDBMS.
- Task 1: Identify entities
- Task 2: Identify attributes
- Task 3: Create an ERD using the pgAdmin ERD Tool
- Task 4: Normalize tables
- Task 5: Define keys and relationships
- Task 6: Create database objects by generating and running the SQL script from the ERD Tool
- Task 7: Create a view and export the data
- Task 8: Create a materialized view and export the data
- Task 9: Import data into a MySQL database using phpMyAdmin GUI tool
- Task 10: Import data into a MySQL database
Data
In your scenario, you will be working with data from the following sources:
- Staff information held in a spreadsheet at headquarters (HQ)
- Sales outlet information held in a spreadsheet at HQ
- Sales data output as a CSV file from the POS system in the sales outlets
- Customer data output as a CSV file from a custom customer relationship management system
- Product information maintained in a spreadsheet exported from your supplier’s database
Task 1: Identify Identities
Here is sample data from each source we’ll be working with:
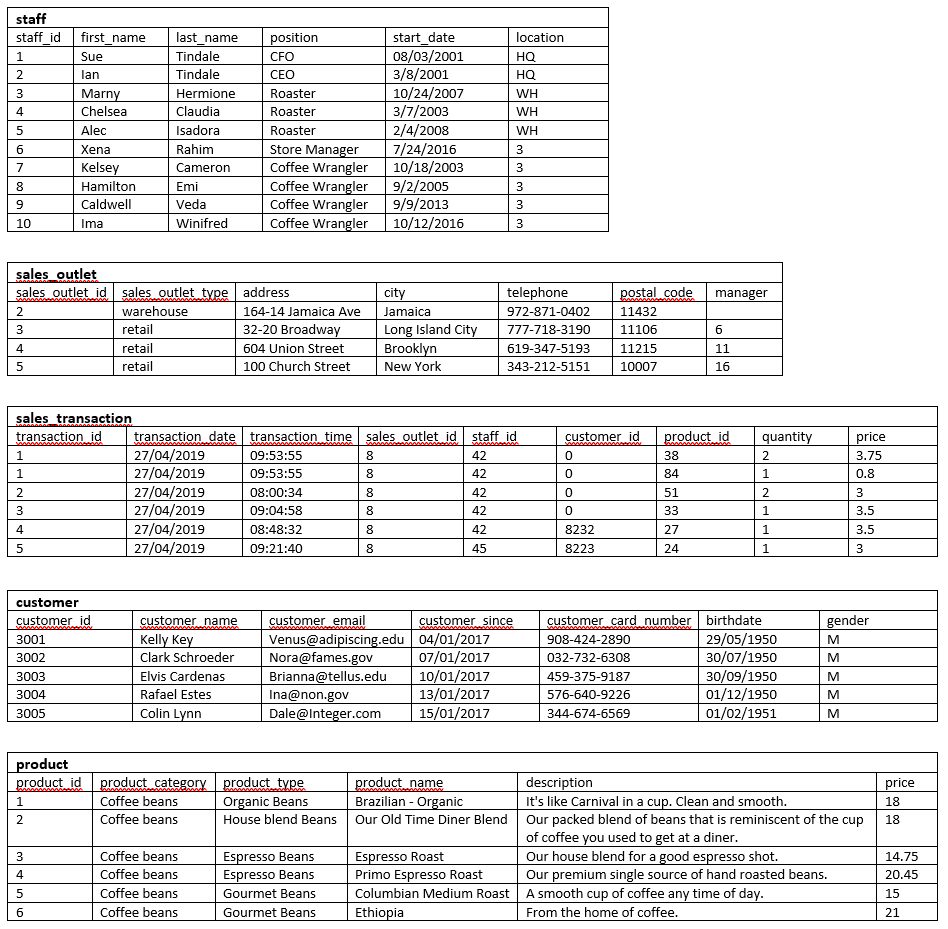
List of Identities
I’ll try to keep the names as close to what they are as possible this way it’s easier for everyone involved in the day to day activity to recognize the data structure.
Notes:
- staff: I noticed in staff table that it is possible that a staff member will work in different locations so it would be wise to add another entity and call it location
- sales_outlet: I have no idea what the numbers in manager column signify, are those meant to be staff_id? If so, some values are not in staff table
- customer: customer_name will surely have the possibility of the same customer having multiple spellings and/or emails, so the possibility of duplicate customers is very high, so we need to set email to unique
- sales_transaction: this table contains duplicate transaction_id entries, so we need to move attribute(s) to a new table to make it 2NF
Here is the list of entities:
- staff
- sales_outlet
- sales_transaction
- customer
- product
Task 2: Identify Attributes
- Using the information from the sample data in the image from Task 1, identify the entity’s attributes that will store the sales transaction data.
- I will wait and add the location table when we get to normalization
- Here is a list of the attributes for the sales_transaction entity
Sales_Transaction Attributes
- transaction_id
- transaction_date
- transaction_time
- sales_outlet_id
- staff_id
- customer_id
- product_id
- quantity
- price
Now that you have defined some of your attributes and entities, you can determine the tables and columns for them and create an entity-relationship diagram (ERD).
- Open a new terminal from the side-by-side Cloud IDE.
- Use the button below to start a PostgreSQL service session in the Cloud IDE.
- Use the pgAdmin weblink to open pgAdmin in a new tab in your browser.
- Create a new database named COFFEE, view the schemas in the new COFFEE database, and then start a new ERD project.
- Add a table to the ERD for the sale transactions entity using the information in the following table. Consider the naming convention to use so that your colleagues can understand your data and ensure that the names are valid in other RDBMS. Use the sample data shown in the image in Task 1 to determine appropriate data types for each column.
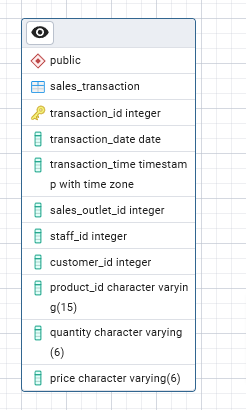
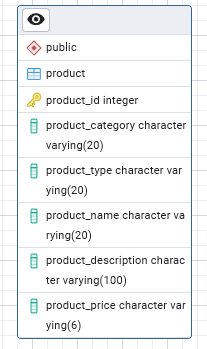
- Add a table to the ERD for the product entity using the information in the following table.
Task 4: Normalize Tables
sales_transaction

When reviewing your ERD, you notice it does not conform to the second normal form. In this task, you will normalize some of the tables within the database.
Review the data in the sales transaction table. Note that the transaction id column does not contain unique values because some transactions include multiple products.
Determine which columns should be stored in a separate table to remove the repeating rows and to put this table into second normal form.
Add a new table named sales_detail to the ERD, define the columns in the new table, and delete the moved columns from the sales transaction table, leaving a matching column in each of the two tables to create a relationship between them later.
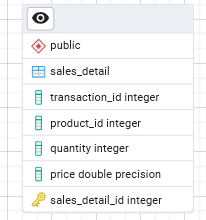
Here we’ll take out
- transaction_id, product_id, quantity, price to a new table sales_detail
- tie the tables using the transaction_id column
product

Review the data in the product table. Note that the product category and product type columns contain redundant data.
Determine which columns should be stored in a separate table to reduce redundant data and to put this table into a second normal form.
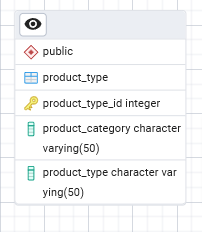
Add a new table named product_type to the ERD, define the columns in the new table, and delete the moved columns from the product table, leaving a matching column in each of the two tables to create a relationship between them later.
Here is the new table being added: product_type
Task 5: Define Keys & Relationships
After normalizing your tables, you can define their primary keys and relationships between the tables in your ERD.
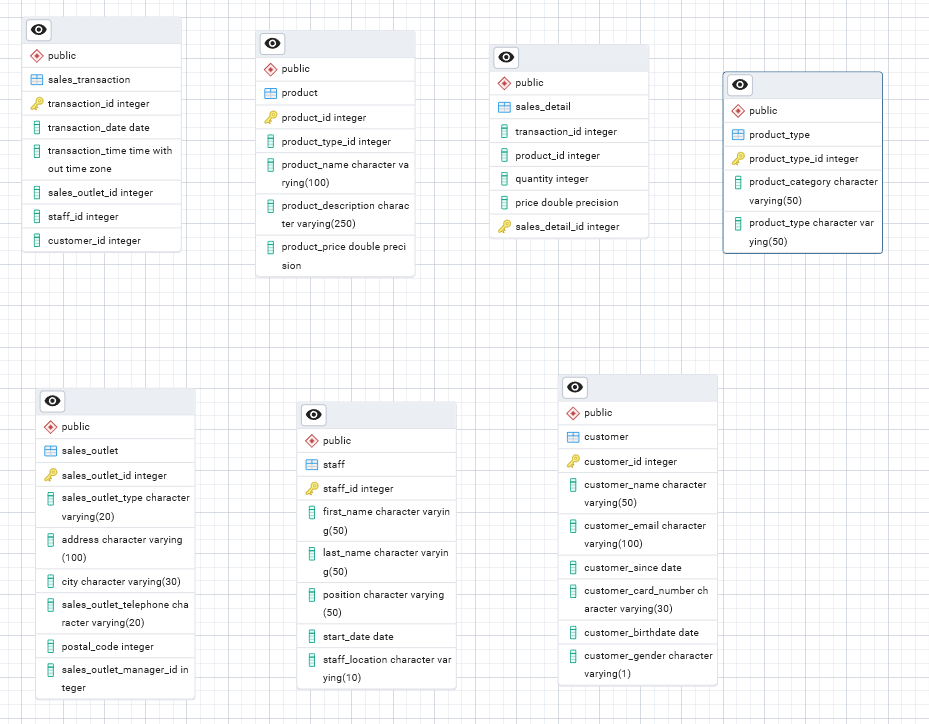
- Identify an appropriate column in each table to be a primary key and create the primary keys in the tables in your entity-relationship diagram (ERD).
Relationships
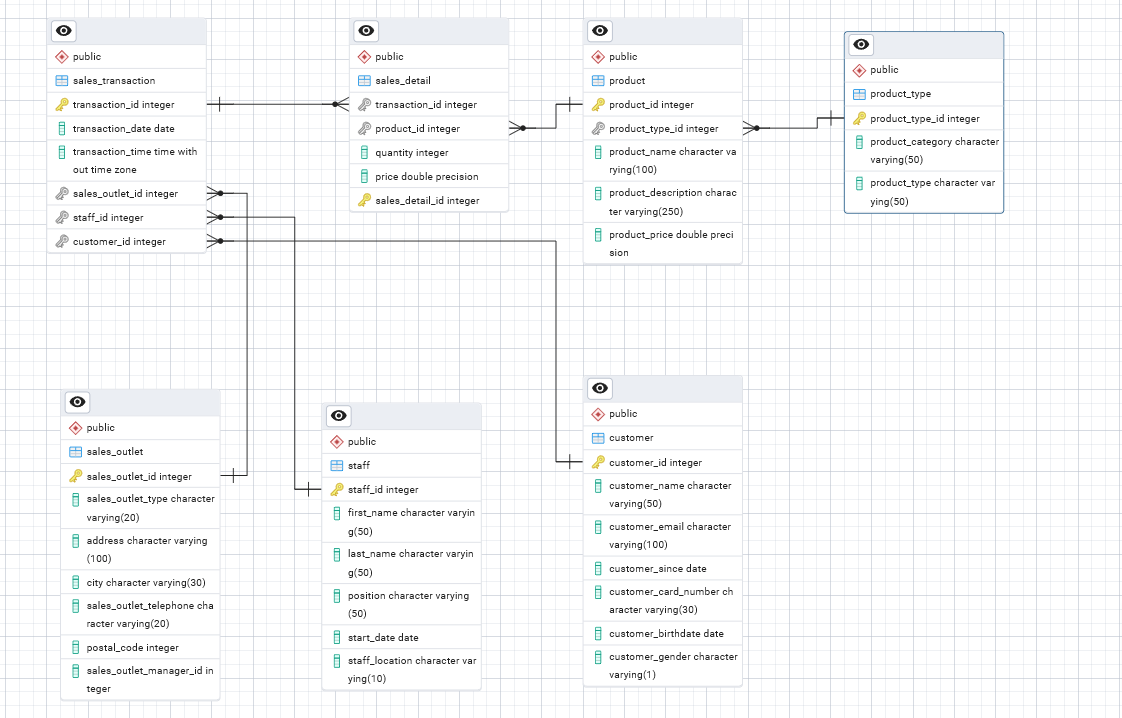
Identify the relationships between the following pairs of tables and then create the relationships in your ERD:
sales_detail to sales_transaction
sales_detail to product
product to product_type
Task 6: Run EDL Script - Create DB objects
- Now that your design is complete, you will generate an SQL script from your ERD, which you can use to create your database schema.
- For this project, you will then use a given SQL script to ensure that you can load the sample data into the schema.
- Finally, you will load the existing data from various sources into your new database schema.
Generate SQL
- Use the Generate SQL functionality in the ERD tool to create an SQL script from your ERD
- Here is the SQL script:
Upload schema script 1
- Download the following
GeneratedScript.sqlfile to your local computer. - In pgAdmin, open the query tool, upload and open the
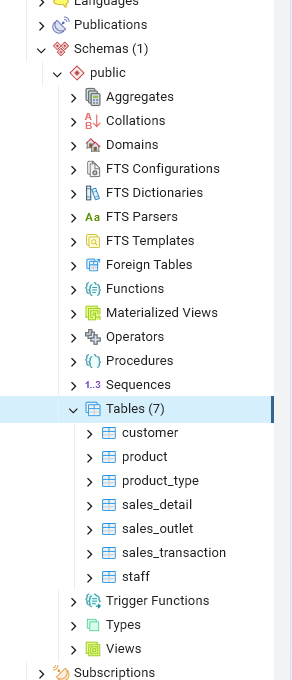
GeneratedScript.sqlfile from your local computer, and then run the script to create the tables defined in the ERD. Verify that the tables exist in the COFFEE database\’s public schema now.
Upload schema script 2
- Download the following
CoffeeData.sqlfile to your local computer. - In pgAdmin, open another instance of the Query tool, upload and open the
CoffeeData.sqlfile from your local computer, and then run the script to populate the tables you just created. - In pgAdmin, view the first 100 rows of the
sales_detailtable.
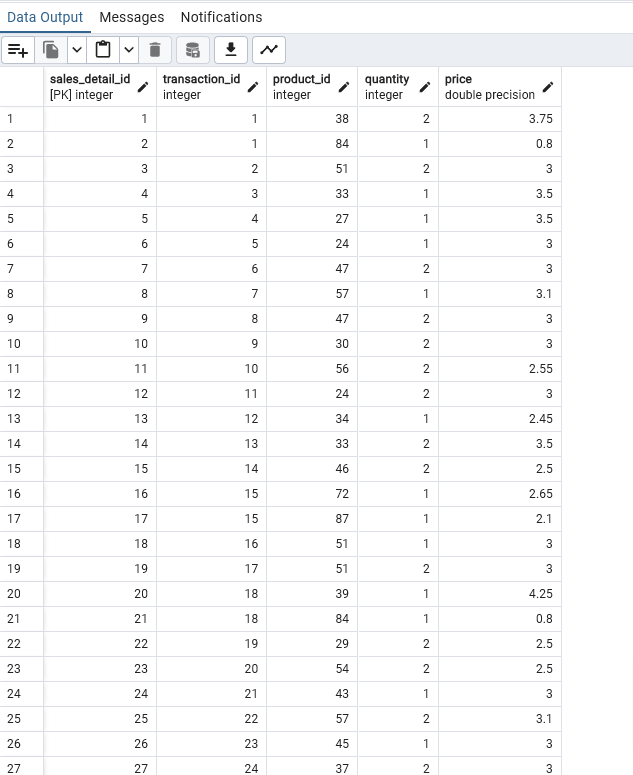
- Take a screenshot of the Data Output pane and save it as Task6B.png or Task6B.jpg.
Task 7: Create View & Export Data
The external payroll company has requested a list of employees and the locations at which they work. This list should not include the CEO or CFO who owns the company. In this task, you will create a view in your PostgreSQL database that returns this information and export the results to a CSV file.
- In COFFEE> Tree > Schema > Views > Create View
- Paste the code below
SELECT staff.staff_id,
staff.first_name,
staff.last_name,
staff.location
FROM staff
WHERE "position" NOT IN ('CEO', 'CFO');
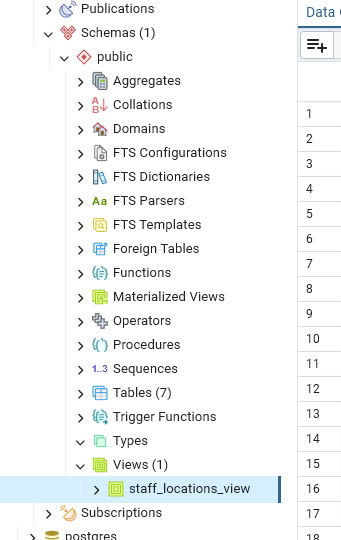
View all the rows returned from the view.
Save the query results to a file named
staff_locations_view.csvon your local computer.
Task 8: Create Materialized View & Export Data
A marketing consultant requires access to your product data in their MySQL database for a marketing campaign. You will create a materialized view in your PostgreSQL database that returns this information and export the results to a CSV file.
- In your
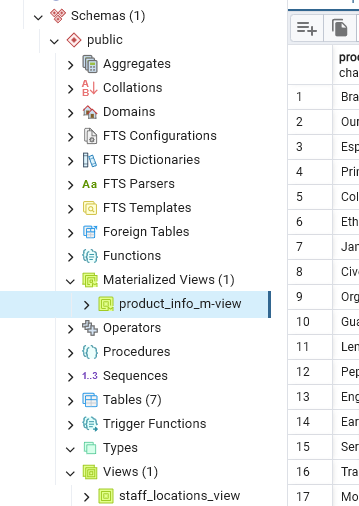
COFFEEdatabase, create a new materialized view namedproduct_info_m-viewusing the following SQL:
SELECT product.product_name, product.description, product_type.product_category
FROM product
JOIN product_type
ON product.product_type_id = product_type.product_type_id;
Refresh the materialized view with data.
View all the rows returned from the view.
Save the query results to a file named
product_info_m-view.csvon your local computer.
Task 9: Import Staff location into MySQL
The external payroll company has asked you to upload the staff location information to their MySQL database.
Open phpMyAdmin in a new tab in your browser.
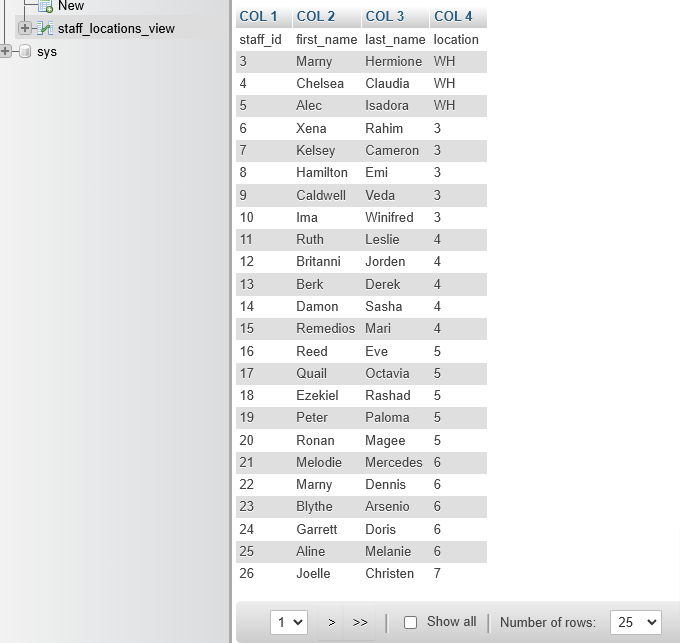
In phpMyAdmin, create a new database named
STAFF_LOCATIONS, then import the location information saved in thestaff_locations_view.csvfile you exported from the view you created in Task 7.Explore the new table and then view the data in it.
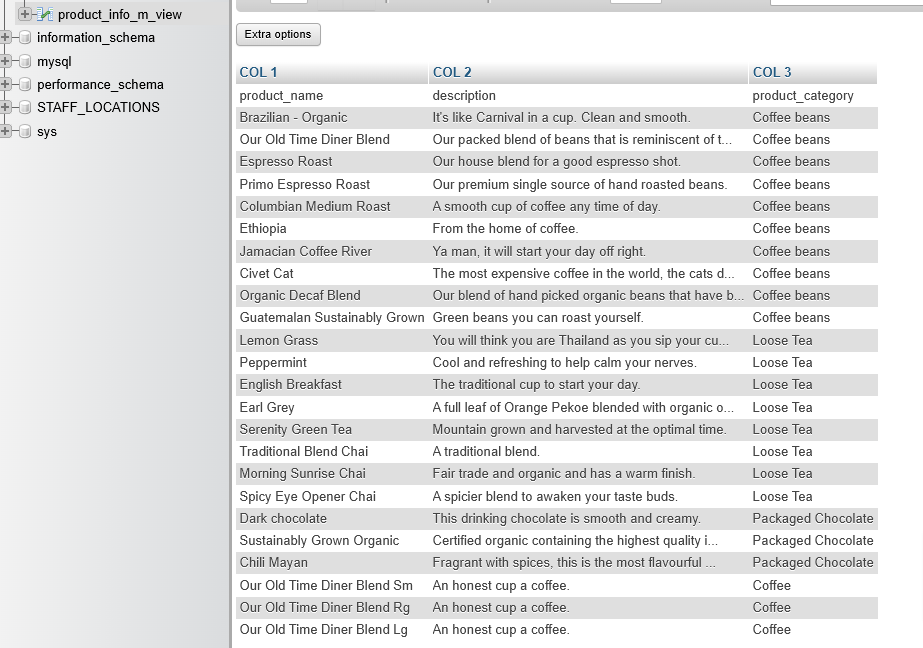
Task 10: Import Coffee Products into MySQL
The marketing consultant has asked you to upload the product information to their MySQL database.
In phpMyAdmin, create a new database named
coffee_shop_products, and then import the product information saved in theproduct_info_m-view.csvfile from your materialized view into a new table in thecoffee_shop_productsdatabase.Browse the contents of the new table.
Import staff location into DB2
The external payroll company has asked you to upload the staff location information to their Db2 database.
In a new browser tab, go to cloud.ibm.com/login, log in using your credentials, and then open a console for your Db2 on the Cloud instance you created earlier in this course.
Use the Load Data feature to load a new table named
STAFF_LOCATIONSwith the staff location information saved in thestaff_locations_view.csvfile you exported from the view you created in Task 7.Explore the new table and then view the data in it.
Take a screenshot of the contents of the new table and save it as Task9.png or Task9.jpg.